-
Getting StartedLearn all about the basics and fundamental aspects of SimpleConsign
-
LoginEverything you need to know about logging into SimpleConsign.
-
PrintingFind out how to configure and print receipts and labels.
-
Point of Sale (POS)Learn about the ins and outs of our checkout system.
-
Consignor ManagementLearn how to set up and manage consignor accounts.
-
Customer ManagementLearn how to create and manage customer accounts.
-
Inventory ManagementLearn how to track, add, edit, and transfer inventory.
-
User ManagementDetermine who has access to your store and the extent of that access.
-
Store Reporting and AnalyticsFrom daily reports to custom curiosities - find instructions within.
-
BillingStep by step instructions for updating your subscriptions and billing.
-
Consignor ResourcesResources for consignors and dealers who work with our stores.
-
Additional ResourcesTraining and videos to help you figure everything out.
-
Support and TroubleshootingStill stumped? Get more information about how to contact support and additional troubleshooting here.
-
Release NotesView the latest happenings in the software.
Promoted articles
-
Overview
SimplePay is SimpleConsign's fully-integrated payment processing solution. For more information on the benefits of this integration, please refer to our SimplePay page.
If you're an existing customer interested in integrating SimplePay, please contact our support team. We'll facilitate the beginning of this process by connecting you with our SimplePay partners.EMV Terminal Setup
Upon receiving your EMV terminal from SimplePay, please refer to the setup guides located at the end of this article for device-specific instructions.
If you are integrating additional devices into an existing setup (e.g., Fortis/Zeamster or Fiserv/CardConnect) and your device is not listed, kindly contact your payment processor for further assistance.
Hardware Installation Meeting for New Customers
New customers will have a Hardware Installation Meeting scheduled during the transition from sales to the onboarding team. In this meeting, a Technical Support Specialist will ensure your SimplePay account credentials are properly loaded onto the device and guide you through the next steps of the setup process. The credentials step must be completed by SimpleConsign and cannot be performed by end-users.
If you're a new customer and do not have a Hardware Installation Meeting scheduled, please contact your Onboarding Specialist or reach out to our support team.
Mapping EMV Devices to Workstations
To associate an EMV device with a workstation in SimpleConsign:
-
Navigate to the Back Office section of the software.
-
Click on Settings, then select EMV.
-
Choose the location you're configuring.
-
Click Find New EMV Devices. Assign a recognizable name to each device for easy identification, especially when managing multiple devices.
-
Click Save and Exit.
6. On the computer designated for the device, access the appropriate Terminal within SimpleConsign.7. Go to the Admin tab on the far right. From the dropdown menu, select the EMV device to associate with this workstation.
8. Conduct a test transaction to verify proper functionality.SimplePay Support
If you encounter issues with SimplePay:
-
First, check the SimplePay Status Page for any known outages.
-
If no outages are reported, contact SimplePay Support for assistance with:
-
Funding issues
-
Bank account changes
-
PCI compliance guidance
-
Terminal problems
-
CardPointe portal support
-
Statement inquiries
-
EMV-related issues
-
Contact SimplePay Support:
-
Phone: 888-249-0445
-
Email: simplepay@simpleconsign.com
Additional Resources
Troubleshooting
For assistance with integrated processing issues, refer to our Troubleshooting Guide.
EMV Terminal Guides
-
-
SimpleConsign allows you to process consignor payouts individually or in bulk. This guide provides step-by-step instructions for each method, ensuring accurate and efficient payout processing.
Individual Payouts
To process a payout for a single consignor:
Navigate to the Consignment tab.
Use Consignor Search to locate and select the desired consignor.
Click the Pay Out button.
You will be presented with two payout options:
Pay Out a Specific Amount
This method adjusts the consignor's balance without marking specific items as paid.
Steps:
Enter the payout amount.
-
Select the Payment Type:
SimpleACH (must be enabled at both the Store and Consignor levels)
Cash (only available from an open Terminal)
Check (optionally enter check number)
Store Credit
(Optional) Add notes for additional details.
Click Submit Payout
Note: Use this method cautiously, as it does not reconcile individual items and may lead to discrepancies if not managed properly.
Pay Out on Items
This method adjusts the account balance and marks selected items as paid.
Steps:
Set a Cutoff Date to limit the payout to entries on or before that date.
-
Choose the Payment Type:
SimpleACH (must be enabled at both the Store and Consignor levels)
Cash (only available from an open Terminal)
Check (optionally enter check number)
Store Credit
(Optional) Add notes for additional payout details.
- (Optional) Check Print Detailed Report.
Click Submit Payout.
Note: If printing both a check and a detailed report, the check will print first.Handling Negative Account Entries
If the consignor’s account has a negative entry you wish to include in the payout, ensure it is selected along with the other items before submission.
Cash Payouts
If cash is not available as a payment option, it may indicate that you are processing the payout from the Back Office or from a terminal that has not yet been opened. For more details, refer to:
Bulk Payouts
To process payouts for multiple consignors simultaneously:
Navigate to the Consignment tab.
Click the Pay Consignors With Pending Payouts link in the Consignor Search section.
Steps:
Enter the Minimum Payout Amount to set a threshold; consignors with balances below this amount will retain their current balance.
-
Select the Payout Type:
SimpleACH (must be enabled at both the Store and Consignor levels)
Check (enter check date and beginning check number)
-
Store Credit
Note: Cash payments are not available for bulk payouts.
Choose the Cutoff Date to limit the payout to entries on or before this date.
-
Click Apply Filters and Search to view consignors eligible for payout based on the selected filters.
Note: The order of the grid where the consignors are listed is the order in which the payouts will print. To sort alphabetically by last name, click on the grid headers to reorder.
Uncheck any consignors you do not wish to include in the payout.
Click Submit Payout.
- After submission, you can print any of the following:
- Checks
- All Payout Reports
- Batch Summary Report
Best Practices
Whenever possible, pay out on items to ensure proper reconciliation and prevent duplicate payouts.
Use the Notes field to document unusual adjustments or custom logic.
Ensure SimpleACH is enabled for both the store and consignor before use.
-
Overview
SimpleACH allows U.S.-based stores on the Standard or Professional Plan to pay consignors via direct deposit. This feature simplifies and secures the payout process by eliminating checks and streamlining bulk payouts.
This guide walks store users through enabling and configuring SimpleACH for their business.
Eligibility Requirements
- Your store must be based in the United States.
- You must be on the Standard or Professional plan.
Preparation
- Review our SimpleACH FAQ document to learn more about the functionality and the important details of SimpleACH.
-
Collect Required Documents
To ensure a smooth setup of SimpleACH, please have the following documents ready. Information from each document will be required, and you may need to upload a digital copy.-
Business Documentation:
- Form SS-4: This document contains your Employer Identification Number (EIN), with "SS-4" labeled in the top right corner, approximately three lines down.
- Proof of Address: You may be asked to verify your business address, so please have a recent utility bill, financial statement, tax statement, or a fully executed lease agreement available.
- DBA Documentation: If your business operates under a "Doing Business As" name, have your DBA documentation on hand.
- Personal Information: For all beneficial owners with 25% or greater ownership, you will need their Social Security Number (SSN) and a valid photo ID.
-
Bank Account Information: Ensure you have the bank account login credentials, routing number, and account number for the account from which payments will be made.
-
Business Documentation:
-
Verify User Permissions
The Primary User of the account must be present to complete the SimpleACH setup. To confirm your status as the Primary User, log in to the Back Office, navigate to the User tab, and double-click on your profile. If you are the Primary User, you will see a note confirming this, and your account will be designated as an Admin user.
Please be aware that enabling SimpleACH may force a password reset for all Back Office users if their current passwords to do not meet security requirements. The new password must be a minimum of 8 characters and include an uppercase letter, a lowercase letter, a number, and a special character.
-
Verify Payouts Permissions
Users who manage consignor payouts will need a 12-character password meeting the same complexity requirements. To assign payout permissions, navigate to the user’s profile, click on the user, and select the SimpleACH button.
Configure Store SimpleACH
- When you are ready to begin setting up SimpleACH, log in to the Back Office side of the software, navigate to the Company tab, and select the green SimpleACH Configuration button to proceed.
-
From here, the Primary User will be sent an email containing a 6-digit code.
-
Copy and paste the code in SimpleConsign and hit Submit.
A new window will appear, displaying five tabs: Info, Account, Beneficial Owners, Funding Sources, and Assign. You will need to navigate through each tab and provide the required information to configure SimpleACH.
-
Review the details provided in the Info tab.
The Info tab includes reminders about the documents you may need in the upcoming steps and key details about payouts through SimpleACH.
-
Next, navigate to the Account tab and click Create My Account Now.
-
Enter your Account information like email, first and last name, legal business name, and business type. Click Continue to proceed.
-
Complete your Business Information. At the bottom of this screen, you'll see a check box for "I am also a company controller." If you are responsible for managing the business and its finances, check this box. Click Continue to proceed.
-
Fill out the User Verification fields. This is your personal information, input your title as relates to the business, if your paperwork says Owner then input that. For the address, that would be your personal/ residential as can be verified on your government ID. Check the terms of service and privacy policy box if you agree. Click Agree and Continue to move on to the next step.
- Complete the Controller information. You'll need documentation to verify the identity of the controller (i.e. driver's license, passport, ID card, business document, etc.) and also provide a digital copy of the document you choose. Click Submit to move on.
- Complete the Business Document upload and hit Submit.
- If the upload is successful, you'll receive a confirmation message. Close the window to proceed.
-
If any documentation is missing, an alert will prompt you to address the issue.
Important note: Once all documents are successfully uploaded, they will be reviewed by Dwolla for accuracy. This process may take up to 3 business days. -
Next, navigate to the Beneficial Owners tab. Select the appropriate option for business ownership:
- At least one individual owns 25% or more of the business.
- No individual owns 25% or more of the business.
Click Continue.
- Select the +Add Owner button.
- Fill out the owner information. If your personal address is different from the business address, please input your personal address as the beneficial owner. Select Submit when done.
- Repeat steps 14 and 15 if you have multiple owners. Check the acknowledgment box and hit Submit.
- If the upload is successful, a confirmation message will appear. Close the window to proceed.
- Next, navigate to the Funding Sources tab and click Link Funding Source.
- You'll be redirected to a new screen to connect your bank account through Plaid. Click Get Started.
- Enter your phone number and click Continue.
- Verify your phone number by entering the code that was text to you and click Continue.
- Find and select your financial institution.
- Enter your bank account Access ID and Passcode.
- Repeat steps 18-23 if you will be using multiple funding sources. Once your funding source is connected, navigate over to the Assign tab and select the funding source for each location. You may choose to use different funding sources for different locations if desired.
- Congratulations! You completed the Store SimpleACH setup. You may need to wait a few days before your documentation is approved but once that's done, you're ready to begin setting up SimpleACH for your consignors or vendors.
Configure SimpleACH for Consignors/Vendors
- Navigate to the Consignor tab and double-click on the Consignor profile.
- Check mark SimpleACH Enabled. This will send a notification to the consignor or vendor.
- Hit Save and Close at the bottom of the profile window.
- From here, the consignor will need to follow the instructions outlined in our SimpleACH Setup for Consignors and Vendors guide.
- Once the consignor or vendor has completed their SimpleACH setup, you’ll see a '✔︎' next to each step of the of the SIMPLEACH SETUP PROGRESS section. Each step: Verify Email Address, Created Account, and Created Funding Source needs to be completed in order to use SimpleACH.
Reporting
To effectively manage and monitor ACH readiness for your business, please refer to our SimpleACH Consignor/Vendor Setup Status Custom Report article. This guide will help you build a custom report to identify which consignors or vendors are set up for direct deposit and which are not.
Important note: If at any point you have difficulty configuring SimpleACH, please reach out to the SimpleConsign Support Team for assistance. We're here to help! -
The SimpleConsign Shopify integration allows you to connect your in-store operations with your Shopify online store. By linking SimpleConsign and Shopify, you can manage inventory across both platforms, reduce manual data entry, and keep product information consistent.
This guide provides a detailed overview of the integration, including setup requirements, step-by-step instructions, video resources, and links to additional support articles.
Benefits of Integrating Shopify with SimpleConsign
Inventory Sync: Keep your in-store and online inventory updated to help prevent overselling.
Order Management: Shopify sales automatically appear in SimpleConsign.
Product Consistency: Update product information in one place.
Multichannel Selling: Manage your physical and online stores together.
Qualifications for Shopify Integration
Before setting up the Shopify integration, please review the following requirements to ensure a smooth process:
1. Account Requirements
-
You must be on the Professional plan with SimpleConsign.
If you are on a different plan, you will need to upgrade to the Professional plan before beginning the Shopify setup process. Contact SimpleConsign Support if you need assistance adjusting your plan.
-
You must have an active Shopify account with a paid subscription.
Your Shopify store should be live and publicly accessible. Password-protected or "coming soon" stores cannot sync with SimpleConsign.
You need Shopify Admin permissions or appropriate access to install apps and manage store settings within Shopify.
2. Training & Readiness
-
You must have completed the SimpleConsign onboarding and training process.
A basic understanding of SimpleConsign is essential to successfully manage the integration and operate your store.
If you are migrating from another software, that migration must be fully completed before setting up the Shopify integration.
3. Shopify Website & Location Requirements
-
You will need a Shopify website, even if it is still under development.
The appearance and design of the website are not a factor for integration, we only need an active website to link to. Your product data will come from SimpleConsign.
-
For new Shopify websites:
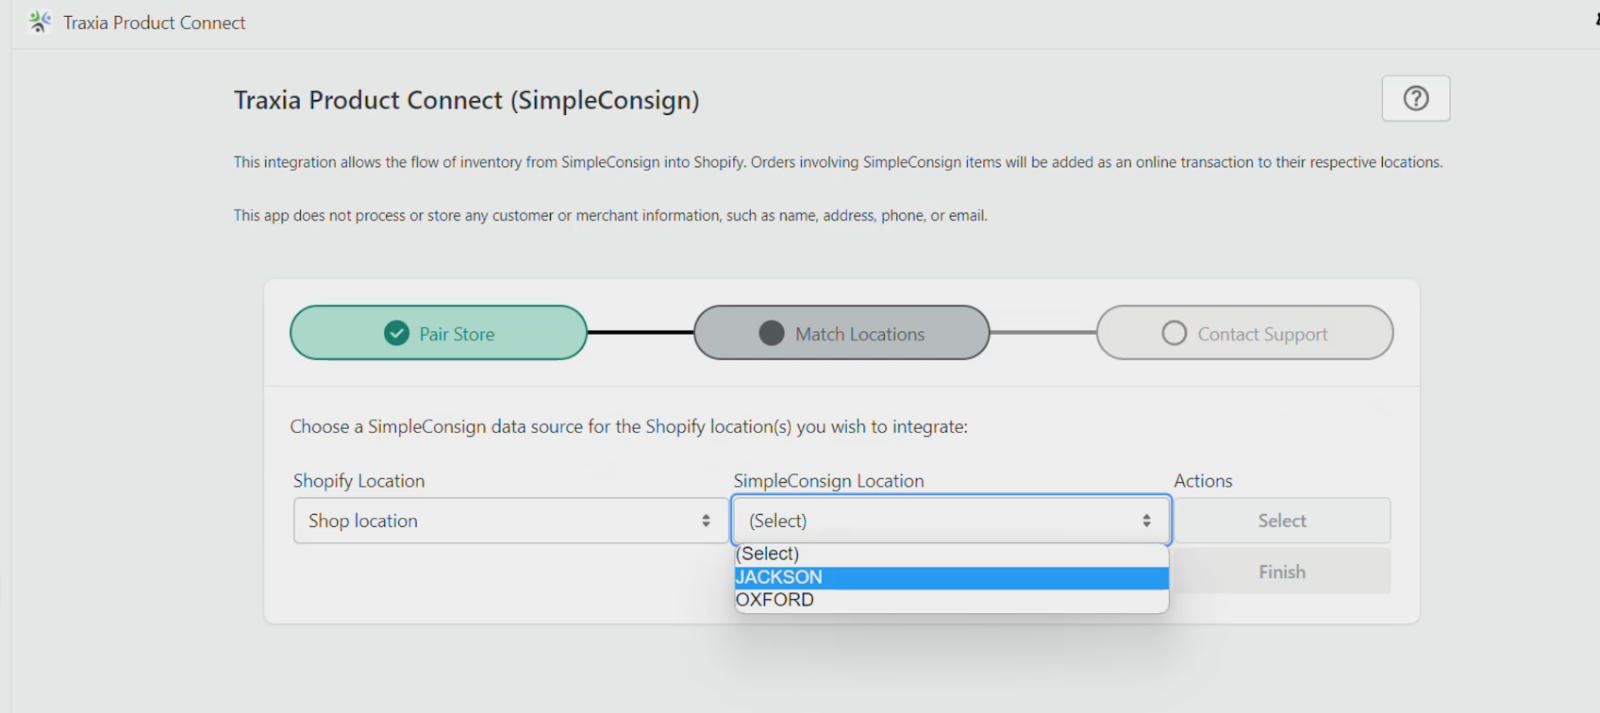
Go to Settings in your Shopify account and confirm your location is listed correctly. This location is how SimpleConsign connects your Shopify store to your corresponding SimpleConsign location.
-
If you make changes to your Shopify locations after the integration is connected, notify SimpleConsign Support as soon as possible.
Changes to locations without notification can disrupt the integration. Our team can easily correct this, provided we are informed.
Setting Up the Shopify Integration
Follow these steps to connect your Shopify store to SimpleConsign:
Step 1: Confirm Your Location Settings in Shopify
Log into your Shopify Admin.
Go to Settings → Locations.
Review your location information carefully.
Make any necessary updates now - modifying this after setup can cause problems with the integration.
Step 2: Install the SimpleConsign App (Traxia Product Connect)
In your Shopify Admin, visit the SimpleConsign app listing. (please note you will not find the app just by browsing the store).
Click Install App.
You will be prompted to enter a code — this code is found in the Settings section on the Back Office side of your SimpleConsign account.
Step 3: Provide Your Shopify Store Name to Support
-
Once the installation is complete, and you reach the settings screen with location drop-downs:
Email SimpleConsign Support your Shopify store name (e.g.,
yourstore.myshopify.com).This allows the support team to complete the link between your Shopify store and your SimpleConsign account.
Step 4: Wait for Confirmation from Support
SimpleConsign Support will confirm when the connection between SimpleConsign and Shopify is fully established.
Do not proceed with product syncing until you have received confirmation.
Step 5: Test the Integration and Review Field Mapping
After you receive confirmation that the connection is complete:
Confirm that products appear correctly in your Shopify store.
Place a test order on Shopify and check that it imports into SimpleConsign.
Ensure quantities update as expected after sales.
Review your field mapping to make sure product details like SKU, title, description, and price sync correctly between platforms.
➔ See: Shopify Field Mapping for details on how fields are connected between SimpleConsign and Shopify.
Shopify Integration Videos Guides
These videos cover:
How to connect Shopify to SimpleConsign
Sync settings walkthrough
Troubleshooting tips
Managing products between platforms
Webinar Recording: Unlock the Power of SimpleConsign x Shopify
In this session, the team explains how to quickly connect your Shopify store with SimpleConsign and highlights the key benefits, including:
Synced inventory between online and in-store sales
Time savings and increased accuracy
Expert tips for maximizing your e-commerce potential
Additional Resources
To help with setup, troubleshooting, and best practices, refer to the following support articles under Shopify Integration:
-
The Store Insights app grants store owners and managers near real-time access to important business metrics directly on their mobile devices. It’s an essential tool for those needing to understand and act on complex business data, particularly in fast-paced retail settings. It serves as an ideal companion to your SimpleConsign Reports, offering insights and information that can be further analyzed within SimpleConsign.Store Insights tracks key data points such as:
- Sales & Online Sales
- Expenses & Profits
- Inventory & Transactions
- Sell-Through Rates
- Cash-Drawer Status
- Login/Logout Data
- Best Selling & Worst Selling Items
- Single or Multi-Store Management
Downloading the App
The Store Insights app is available for both iOS 14+ for Apple and 7.0+ for Android devices. Please use the links below to download the app.The Store Insights App is available with a Professional plan subscription and must be purchased as an add-on feature for both the Standard and Basic subscription plans.Purchase Add-On (Standard and Basic Plans Only)
For customers wishing to purchase the Store Insights app on the Standard and Basic plans, please follow the instructions below. The add-on is an extra $75/month per location and will be listed as a separate line item on your invoice.- Log in to SimpleConsign and navigate to your profile icon in the upper right corner.
- Select your subscription plan.
- Click ‘Edit Subscription’.
- Hit the ‘Add Add-ons’ button.
- Select ‘Store Insights’ and hit ‘Add’.
Grant User Access
The Store Insights app is accessible to Back Office users. If you’d like to grant app permissions for a Back Office user, please follow the steps below.- From the Back Office, click on the ‘User’ tab.
- Double-click on the user you wish to grant Store Insights access.
-
Check the ‘Store Insights Access’ box and hit ‘Next’.
- Edit location access if needed. Otherwise, hit ‘Save & Close’.
To log into the app, the user must have access to at least one location.Logging In
Open the app on your mobile device and log in using your SimpleConsign Back Office Manager Login ID and password.
If you can’t recall your ID or password, follow the instructions below.- Click ‘Forgot password’. This will redirect you to SimpleConsign in your web browser.
- Select either the ‘Forgot ID’ or ‘Forgot Password’ link in the lower right corner.
- Enter your email address and hit ‘Send Instructions’.
- Check your email for next steps.
Navigating Tabs
The bottom navigation bar allows the user to view different types of data. The selected view is highlighted in yellow for easy reference.-
Sales: Quickly view sales totals, transaction counts, item counts, and popular payment methods with filters for location, sales channel, and timeframe.
-
Details: Gain further insights into sales trends, including best-selling brands/categories, sell-through rates, and sales aggregates. Use filters for locations, sales channels, and timeframes to delve deeper.
-
Trends: See how your business is performing this year compared to previous years and anticipate future sales trends across sales channels and locations.
-
Store: Quickly review account statuses, outstanding balances, and inventory values + ratios, either across all locations or for a specific one.
-
Terminals: Monitor terminal status, including whether the close-out process has been completed, by whom, and if the drawers are balanced.
Selecting FiltersThere are 3 types of filters available within Store Insights:-
Locations
- All locations
- Single locations
-
Sales channel(s)
- In Store
- Online
- Both
-
Date range
- Predefined
- Custom ranges
Filters will be available on relevant screens and allow users to view their data from different angles.Finding Additional Details
Additional details can be found under different tiles. Simply tap the tile to reveal more information.Example:Total sales expands to display the mix of payment types used, $ value of voids/ returns, and a breakdown of the store amount + consignor amount generated from the transactions.Tool Tips
Tool tips are included on the tiles for easy reference and understanding of what each figure means. Simply click on the question mark icon in the upper right corner of the widget to reveal the tool tip.Logging Out
To log out of the Store Insights app, click the user profile in the top right corner.This allows work phones and tablets to be shared without unauthorized usersaccessing the app. -
Overview
SimpleACH enables consignors to receive payouts via direct deposit—faster, safer, and without the need for checks. If your store has enabled this feature, this guide will help you set up your banking information through Consignor Access.
Requirements
-
Your store must have ACH payouts enabled before it becomes accessible in Consignor Access
-
You must have access to Consignor Access.
-
A verified email address is required.
How To Setup SimpleACH in Consignor Access
- If your consignment store has implemented SimpleACH, you will receive a notification, and a "SimpleACH" option will appear at the bottom of the Consignor Access left-hand navigation menu.
- Click SimpleACH to initiate the setup process. The initial prompts will guide you through connecting your account. SimpleACH employs a secure third-party payment processor, ensuring that neither the store nor SimpleConsign retains your bank account information.
- To proceed, enter your email address, first name, and last name, then click Continue.
- You will be prompted to provide your bank account details, including the routing and account numbers, which are necessary to facilitate direct payments to your bank.
- After verifying the accuracy of your bank information, click Add Bank to link your account to SimpleACH.
- This connection will enable the SimpleACH feature in SimpleConsign for future payouts.
Important note: Once an ACH payment is processed, it cannot be reversed unless the payment fails, typically due to incorrect bank information entered into SimpleACH. ACH payments may take 2 to 5 business days to appear in your bank account, depending on your bank’s processing times.Tip: Consignors who consign at multiple, unaffiliated stores will need to create separate ACH accounts using a unique email address for each account. -
Additional Resources
-
Weekdays: 9am - 5pm CST -
Weekdays: 5pm - 8pm CST Weekends: 10am - 2pm CSTEmergency Support Hours -
Sign up for Live Training
Learn all the ins and outs of SimpleConsign with one of our experts.