The SimpleConsign Shopify integration allows you to connect your in-store operations with your Shopify online store. By linking SimpleConsign and Shopify, you can manage inventory across both platforms, reduce manual data entry, and keep product information consistent.
This guide provides a detailed overview of the integration, including setup requirements, step-by-step instructions, video resources, and links to additional support articles.
Benefits of Integrating Shopify with SimpleConsign
Inventory Sync: Keep your in-store and online inventory updated to help prevent overselling.
Order Management: Shopify sales automatically appear in SimpleConsign.
Product Consistency: Update product information in one place.
Multichannel Selling: Manage your physical and online stores together.
Qualifications for Shopify Integration
Before setting up the Shopify integration, please review the following requirements to ensure a smooth process:
1. Account Requirements
-
You must be on the Professional plan with SimpleConsign.
If you are on a different plan, you will need to upgrade to the Professional plan before beginning the Shopify setup process. Contact SimpleConsign Support if you need assistance adjusting your plan.
-
You must have an active Shopify account with a paid subscription.
Your Shopify store should be live and publicly accessible. Password-protected or "coming soon" stores cannot sync with SimpleConsign.
You need Shopify Admin permissions or appropriate access to install apps and manage store settings within Shopify.
2. Training & Readiness
-
You must have completed the SimpleConsign onboarding and training process.
A basic understanding of SimpleConsign is essential to successfully manage the integration and operate your store.
If you are migrating from another software, that migration must be fully completed before setting up the Shopify integration.
3. Shopify Website & Location Requirements
-
You will need a Shopify website, even if it is still under development.
The appearance and design of the website are not a factor for integration, we only need an active website to link to. Your product data will come from SimpleConsign.
-
For new Shopify websites:
Go to Settings in your Shopify account and confirm your location is listed correctly. This location is how SimpleConsign connects your Shopify store to your corresponding SimpleConsign location.
-
If you make changes to your Shopify locations after the integration is connected, notify SimpleConsign Support as soon as possible.
Changes to locations without notification can disrupt the integration. Our team can easily correct this, provided we are informed.
Setting Up the Shopify Integration
Follow these steps to connect your Shopify store to SimpleConsign:
Step 1: Confirm Your Location Settings in Shopify
Log into your Shopify Admin.
Go to Settings → Locations.
Review your location information carefully.
Make any necessary updates now - modifying this after setup can cause problems with the integration.
Step 2: Install the SimpleConsign App (Traxia Product Connect)
In your Shopify Admin, visit the SimpleConsign app listing. (please note you will not find the app just by browsing the store).
Click Install App.
You will be prompted to enter a code — this code is found in the Settings section on the Back Office side of your SimpleConsign account.
Step 3: Provide Your Shopify Store Name to Support
-
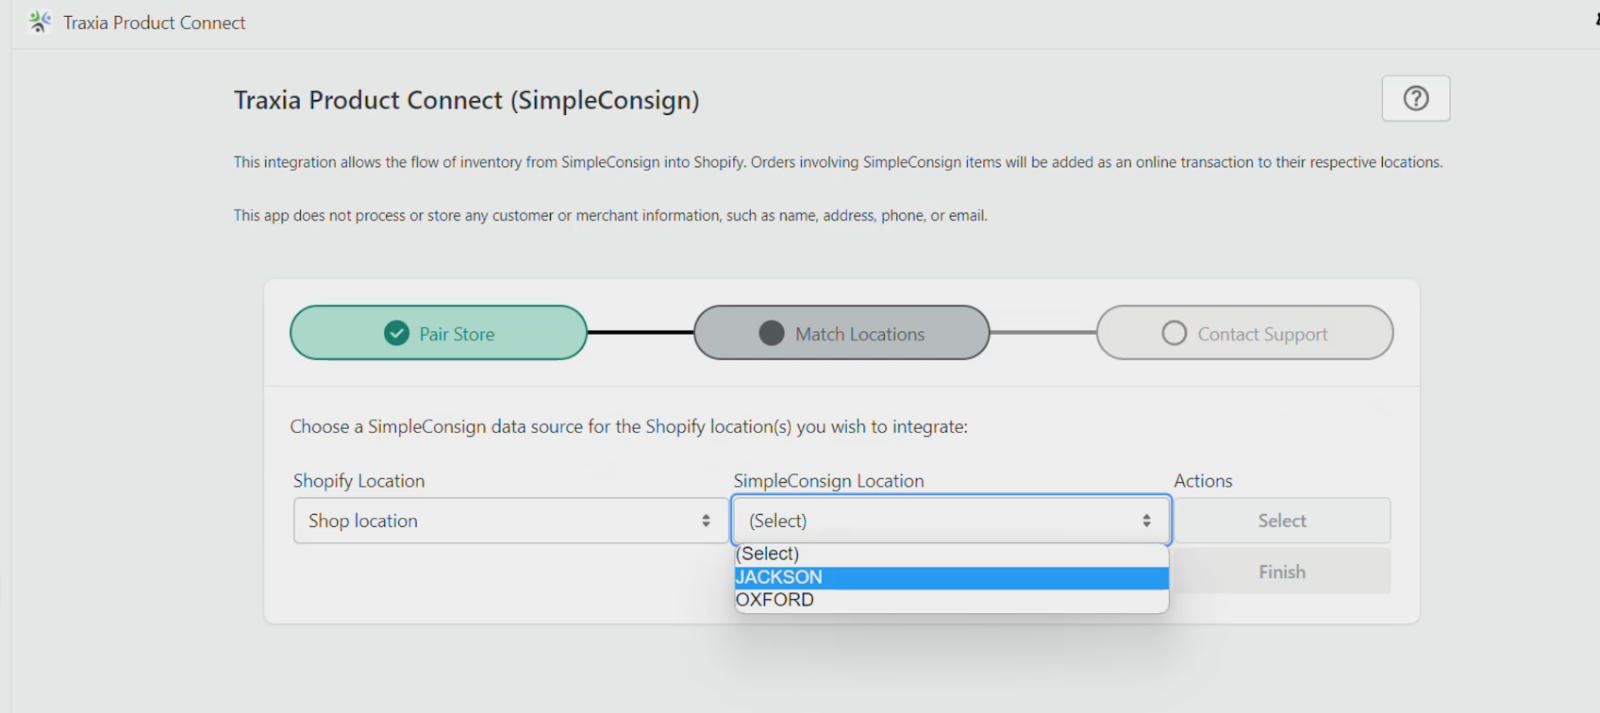
Once the installation is complete, and you reach the settings screen with location drop-downs:
Email SimpleConsign Support your Shopify store name (e.g.,
yourstore.myshopify.com).This allows the support team to complete the link between your Shopify store and your SimpleConsign account.
Step 4: Wait for Confirmation from Support
SimpleConsign Support will confirm when the connection between SimpleConsign and Shopify is fully established.
Do not proceed with product syncing until you have received confirmation.
Step 5: Test the Integration and Review Field Mapping
After you receive confirmation that the connection is complete:
Confirm that products appear correctly in your Shopify store.
Place a test order on Shopify and check that it imports into SimpleConsign.
Ensure quantities update as expected after sales.
Review your field mapping to make sure product details like SKU, title, description, and price sync correctly between platforms.
➔ See: Shopify Field Mapping for details on how fields are connected between SimpleConsign and Shopify.
Shopify Integration Videos Guides
These videos cover:
How to connect Shopify to SimpleConsign
Sync settings walkthrough
Troubleshooting tips
Managing products between platforms
Webinar Recording: Unlock the Power of SimpleConsign x Shopify
In this session, the team explains how to quickly connect your Shopify store with SimpleConsign and highlights the key benefits, including:
Synced inventory between online and in-store sales
Time savings and increased accuracy
Expert tips for maximizing your e-commerce potential
Additional Resources
To help with setup, troubleshooting, and best practices, refer to the following support articles under Shopify Integration: